Pages

Thursday, June 27, 2013

Adventures Never End: Blue Bell Day Trip

As I mentioned yesterday,  my dear friends and I decided to take the kids to the Blue Bell Icecream Creamery.

The day started off pretty normal. We all got together at the agreed upon time and loaded up my friend's van. As we are about to leave, wouldn't you know it, one 2 year old bites the other 2 year old. Then we try for almost five minutes to figure out how to get my ginormous wagon in the car, though eventually we left it behind.

But that couldn't stop us!

So we took off, on our first big day roadtrip together.

About 30 minutes down the road, my friend's newborn got hungry, so we pulled over at a gas station.  As we went to leave again, my friend noticed her check engine light was on and the van was overheating!!

So once again, 5 minutes later, we pulled over.  I got my phone out to Google how to fix an overheated car, both other girls called their husbands.  Looking "like lost city girls", an animal control man pulled over to help us. I wish ee had gotten his name because he was just the nicest man, taking pitty, and poking a little, well deserved, fun at us. So with his help, we were once again on our way.


After that we only had one more potty break until we finally made it!!


Once there... yeah you thought that was it! 

Once there, we rushed to get tickets for the next available tour. We had arrived at 11:30 and the next available tour was at 11:55 . Thinking we had enough time, we decided to have a picnic. Well, needless to say, we were late for the tour. They have left just a few minutes before we got there. Thankfully there were spots on the next tour, so we were able to go on that one.

The rest of the day was a blast. Nothing too exciting happened thankfully.
Here's some of the fun!


Wednesday, June 26, 2013

Quilt Bag

My dear friends and  I are taking the kids to the Blue Bell Factory tomorrow and thought it would be a great idea to picnic!  Nothing like ice cream, beautiful day, awesome company and good food.

This was my first thought.  Then I remembered why I haven't picniced in so long... I didn't have a picnic quilt!

What do I do? In never a dull moment style, I solved the problem. Probably not the easiest, or cheapest way, but I did it!

That being said, I'll show you how I did it, and how to do it an easier way.

First. . Hehe... my way!

You'll need:
2 yards of fabric (I got 1 yard of 2 different patterns)
2 1/4 yards of quilt batting
2 1/4 yards of duct fabric
Sewing machine
Thread

Cut your regular fabric inti 6"x6" squares. Sew the squares into a quilt.


Sew your duct and your batting together. Make sure you sew the edges first then sew in the middle.

Now, sew your quilt and your duct/batting. (Make sure you sew them front to front.)

Make sure you leave a small part open so you can flip the quilt right side out.

I added a ribbon as a border.


Now is when the "Cyndy way" and the easy way coincide. (If you don't want to make a quilt, you can buy one at Walmart.) 

Take your quilt and fold it in thirds, then fold it in thirds again. Take the measurements of your square. Take this measurement and cut a square of fabric this size.
Sew it to the middle bottom of your quilt.


I also added a ribbon to make it a bag and I added a flower to embellish.


Make your own!!!


Monday, June 24, 2013

Cooking From Scratch


I have been on this "real food" kick lately.  I'm hoping it's more than just a kick because I'm actually enjoying this!
Basically,  the short version is you don't eat anything with more than 4 ingredients (try for no chemicals,  preservatives...) and don't eat processed food. Limit your preservatives to as little as possible.  This includes any salt.
You'll be cooking a lot but you'll feel great!
The main thing I was struggling with was food for my daughter.  It seems like anything she'll eat has super processed and full of preservatives. So I figured I would start with snacks.
Goldfish!!
I premade my "dough" so I dont have pictures of that... but I'm sure I'll be making these again soon! ;) This time, I decided to go with whole wheat, but I've done them before with the regular recipe.
So here is the recipe for the dough:
1 1/2 cups cheddar (I like mild cheddar)
4 tablespoons butter
1/2 cup whole wheat flour
1/4 cup all purpose flour
1/8 teaspoon Lipton onion soup powder
Mix all ingredients in a food processor until a dough is formed. 
When you're ready to bake, preheat oven to 350F.
You can freeze the dough for up to two weeks.
Roll out your dough to approximately 1/8".
Once you have. Your dough, you can start cutting out you shapes. I've used different things to cut out my tasty treats. I mainly use piping tips. Today I decided to be adventurous and make fish shapes. 
I started with my piping tip and used some tools to bend in into a fish shape.
Cut out your fish, or whatever shape you are using,  and place them on a cookie sheet covered with wax paper.
Cook for 10-13 minutes. Once you take them out, place them on a plate to cool down.
Enjoy! 

Friday, June 14, 2013

Father's Day Contruction Cake!

Ok so my original idea was to make a cake for my hubby, who works for a home builder, and a cake for my dad who just got a new job. Well it turns out that a. my sister-in-law is making a father's day cake for when my dad visits them the day before he comes here, b. I really don't need to be eating cake left overs for 3 weeks, and c. I really don't need that much cake!

I may still end up making a small cake for my dad, but I'll figure that out tomorrow, after we dig into the construction cake.

Anyways, so I promised to show how to make just about anything out of cake (and fondant). This is a pretty simple cake. It only takes about 3 hrs to complete start to finish. The fun thing about this cake is the decorating!


Let's get started.

(Ingredient list at the bottom)

Mix your cake mix, as directed, and add an extra egg. (I also add a touch of vanilla to make the taste really pop)

 
She's my little helper ;) (This is a great way to let the kids make something special for dad!)
 
 
Coat cake pan, use rectangle, with PAM spray. I like the butter flavored kind, but any kind is fine. Once the pan is fully coated, pour in your batter and bake as directed.
 
 
For all her hard work, my little helper got to lick the wisk. :)
 
 
While the cake is baking, you can start making your fondant. I use a marshmello fondant recipe given to me by a friend. It's easy to make and tastes better than real fondant. The tricky part is kneading it enough to get the right consistency.
 
Get your supplies out.

Heat the marshmellos and 2 tblspn water in the microwave, in a microwave safe dish, 30 seconds at a time, mixing between each cycle, until melted.

*****This part gets hot and sticky----- Use caution and remove all jewelry*****

Grease your countertop with crisco... lots and lots of crisco.

Next, pour your marshmellos onto the greased countertop. You will want to grease your hands well. (be sure to coat your entire hand because this part gets really sticky)

Add powdered sugar a spoonful at a time, kneading the mixture as you would bread. You want your fondant to be maliable enough without breaking. You want to be able to work with it without it sticking to everything, but still moldable. (hint... this is the tricky part)

I don't have a picture of the fondant as I mixed it, and you'll see why. It's SUPER sticky!

Once your fondant is made, set it aside.

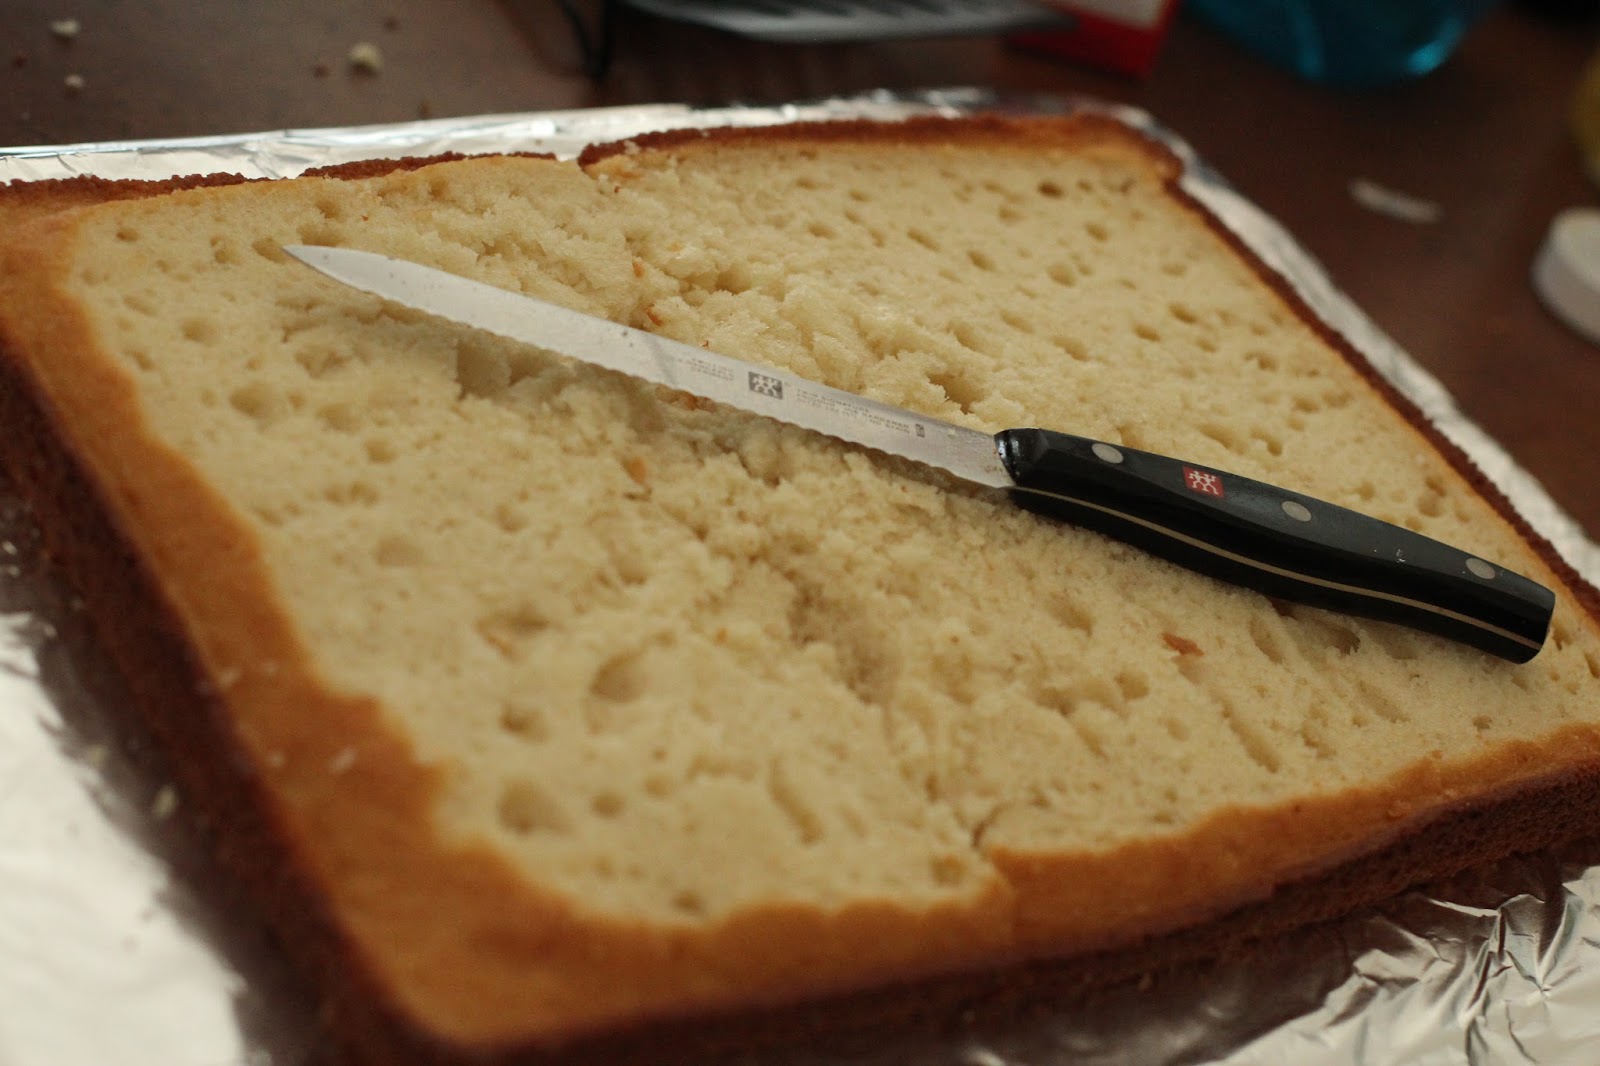
Your cake should be ready by now. Take it out of the oven and place it on a cooling rack.
 
 
Once the cake is cool enough to touch, take a knife, or cake leveler, and level your cake. (cut off the top part the poofs above everything else)
 
 
After the cake is nice and leveled, let the cake cool completely.
Once the cake is cooled, Place on piece on your serving platter/plate/surface.
 
 
Coat the bottom layer with icing, then place the top piece ontop. Coat the entire cake with a thin layer of icing. Place the cake in the fridge. This will harden the icing so that you  can easily put the fondant on top.
 
 
While the icing is hardening, get your fondant back out and make your shapes. I chose to go with a tool belt, a hammer, plyers, a pencil, a box cutter and a tape measurer for this cake. One batch is enough for the accessories and you will need  a seperate batch for the actual covering of the cake. The fondant for the cake covering you can go ahead an color the marshmellos before adding the sugar.
 
 
Now get your paint brush out, a clean one that is food safe, and your food coloring.  Go ahead an go nuts. Be creative and paint!


Once you are done painting, place the shapes in the fridge to solidify a little.

If you haven't made your fondant to cover the cake, now is the time to do it! Once it's made, take out your cake. Roll out your fondant until it's about 1/8" thick. roll it and the place it on your cake. The easiet way to transfer is to roll the fondant so it doesn't stretch, then when you put in on the cake you just unroll it!

Once youre cake is covered, cut off the excess fondant around the edges with a sharp knife. Now place your shapes on top and decorate more if needed.
Presto!!


Recipe:
 
Ingredients:
 
2 packages of 16 oz. marshmellos
2 packages of 16 oz. confectioners sugar
2 tblspn Water
2 cake mixes
1 can of icing
food coloring of your choice
Crisco
 
Mix and bake cakes according to instructions, adding and extra egg per batch and a touch of vanilla.
Let cool and level.
Coat on layer with icing, place other layer ontop. cover with icing. Refrigerate.
 
Melt marshmellos and water in microwave in 30 second intervals, mixing between interavls, until melted. Grease countertop with crisco. Also grease your hands very well. Pour marshmellos on greased countertop. knead in powdered sugar spoonfuls at a time until desired consistency is reached. You want your fondant maliable but wont break or tear when stretched.
 
Decorate cake as desired.
 

Tune in tomorrow to see if I decide to make another cake for Sunday!