Pages

Wednesday, September 9, 2015

My List of Fun Free or Cheap Things To Do in Houston

 I've had the privilege of staying home with our one and only now for 4 and a half years. Though I tried to go back to work a few times, it ended up being better for our family for me to stay home. So being that we were on one income, I wanted to be sure to be respectful of how hard my husband worked by being mindful of how much I was spending.

Thankfully, I was able, through random google searches, other wise moms, and pinterest, to find lots of fun and free, or cheap, things to do as a stay at home mom.  In fact, I kept so busy that I often joke that I am actually a "stay-out-of-the-home mom." ;)

Without further ado, here are some of the things/places I've found:
-Zoo: They have a splash pad that is great for hot summer days (you need a membership, but it's cheap and if you use it, it more than pays for itself quickly)
-Children's Museum  (you can get a membership...or... you can get a FREE library card and do "flip kits" and get FREE passes)
-Flip Kits from Houston Public Library: these are fun books with coordinating activities/crafts, plus you get a free 4 pass to Children's Museum when you complete the survey.
-Toddler Tuesday at Discovery Green: FREE event for little ones through preschoolers. They do storytime, a craft, and usually have characters and other activities.
-Scavenger hunt downtown: you can find lists online... just google ;)
-Houston Mom's Blog activities
- Museums:
   -These are always FREE:
      -Asia Society Texas Center (all spaces except Louisa Stude Sarofim Gallery)
      -Contemporary Arts Museum.    
      -HoustonDiverseWorks (Gallery Space)
      -Houston Center for Contemporary Craft
      -Houston Center for Photography
      -The Jung Center
      -Lawndale Art Center
      -The Menil Collection
      -Rice University Art Gallery
      -Rothko Chapel

  - These museums are FREE certain times:
      -Buffalo Soldiers National Museum – FREE Thursday 1-5pm
      -Children’s Museum of Houston – FREE Thursday 5-8pm
      -Czech Center Museum Houston – FREE last Monday of the month 12-4pm
     -The Health Museum – FREE Thursday 2-7pm
     -Holocaust Museum Houston – FREE Thursday 2-5pm
     -Houston Museum of African American Culture – FREE Thursday 6-8pm
     -Houston Museum of Natural Science – Permanent Exhibit Halls FREE Thursday 3-6pm
     -The Houston Zoo offers free admission to guests on the first Tuesday of each month, September through May, from 12:00 p.m. until closing.
     -The Museum of Fine Arts, Houston – FREE Thursday 10am–9pm

Also, one thing I learned to love and use often was Groupon. They often have great deals at local play places, like Stomping Grounds and Pump It Up.

There are so many more, but this post would never end. The best advice I was given was "Get out there!" If you want to get out with your kiddos, just do it. Go to a park and have a picnic, or find some ducks to feed.  Make a friend with a community, or backyard, pool and have pool days.

Whatever you do, have fun and love on your baby(ies

Thursday, July 2, 2015

Stay At Home VBS


We were all so stoked for VBS this year, but when we found out that I would have a surgery the week before our church had their VBS, our plans changed. I thought I would still be able to do VBS with our church until the Friday before, when I admitted to myself, and my family, that I wasn't going to be able to do it.

Since I was barely able to walk for the first half of our "Stay At Home VBS", most of these activities are easy to do/prep sitting in a recliner.

Thankfully, Lifeway has their curriculum, to a certain extent, on their blog. Mix that, Pinterest, and a little imagination, and we were on our way "Off The Map." (That was the theme for this year...)

So here is our week!

Day 1

Making her bag to hold all of her treasures for the week 


With scrap material I had laying around, I cut and sewed together a vest.


My little explorer!


Making Binoculars


Ready to go!


Picking leaves and twigs


Art project with colored bubbles (food coloring and bubble mix)


We even watched the music video for the day via YouTube


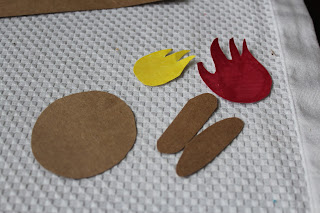
Her first badge was a campfire (all you need is sharpies, cardstock, glue and scissors)


For memorizing her Bible verse for the week, she got a badge!

Day 2


Making a compass because we "Follow" our guide ;)


Next we made a rain stick for our "adventure walks"


All you need for this is a paper towel tube, rice, tape, stickers and markers


Next she made her badge for the day.... a compass


Day 3


First up, we made a firefly sun catcher. (we used cardboard, scissors, white glue, water, saran wrap, and tissue paper)


I cut 2 identical silhouettes of a dragon fly, one for the front,  one for the back, with 2 saran wrap pieces, and the wet tissue paper in the middle.


And of course, a dragon fly badge!

Day 4 and 5 (we combined them)


She made a lion badge (because we learned about Daniel and the lions) and a cross with a heart badge (because Jesus cares for us)


And That was our week!


Friday, June 5, 2015

Reward Chore Chart


We've gone through our fair share of reward charts, sticker charts, chore charts, etc... This time I wanted something that would last, and something that wasn't completely an eye sore.

In come Pinterest!! As usual, I combined several ideas to make something that would fit our family best. (Because really, that's what Pinterest is for.. right?)

I really liked the idea of a magnet board, so that it is reusable. I also like the look of wood and chalkboards. So here's what I came up with!!


Making it was super easy! Here is what I used:
-An old cookie sheet
-1 can of chalkboard spray paint (I also used chalk markers..)
-1 pack of small round, adhesive backed magnets
-1 pack of wood circles (they call them nickels?)
-Wax paper
-Printer
-Google
-Imagination!

I sprayed my cookie sheet and drew my lines and letters. Then, meaning a week later, I got on my computer and designed the "buttons". Once they were all designed, I placed the magnets on the wood circles and printed the designs (flipped) on wax paper (I taped my wax paper to regular paper to keep the wax paper from rolling). After I had my designs printed out, I cut each design and carefully placed each individually on a circle. (***Be careful for this.. once you place the design, DON'T MOVE IT! it will smudge like crazy) Once the design is placed on the circle, press firmly on the design until the design is properly transferred.

Voila! Done!

Friday, March 27, 2015

Easter Shirt (Kid DIY)


So this DIY project is almost completely kid done. 

I started by turning my trusty Silhouette on, and had it cut out, on vinyl, 2 bunny silhouettes. Once it was done cutting, I peeled them off the backing and placed them on the shirt.


 I got the work surface ready, mainly to save on clean-up after, by cutting up a mailing box. I cut an insert to put inside the shirt to prevent "bleeding", and I used the rest of the box underneath everything.


Hobby Lobby had little containers of fabric paint that are perfect for this project. (Having a coupon for it is always a plus!!) For painting, I used q-tips. You can use pencil eraser tips, or dabbers, also.


AND.... I let her go!


Once she was all done, I carefully peeled off the bunnies.